
How to Seal POSCA Pens Permanently: The Master Australian Guide for Glass, Wood & Ceramic

To seal POSCA pens permanently, match the method to the surface. On glass: bake at 160°C for 45 minutes, then apply an archival clear varnish. On pre-glazed ceramic/porcelain: bake at 160°C for no more than 45 minutes, then apply an acrylic-safe clear gloss coat. On raw, unglazed terracotta/bisqueware: bake at 220°C for 45 minutes. On raw timber: seal first with shellac or gesso to block tannin bleed, then finish with 2–3 coats of water-based polyurethane. (Sealing POSCA on fabric is covered in our separate guide.)
Whether you're making wooden milestone plaques to sell, a school art coordinator planning holiday craft, or a café owner updating your menu window, you want the hand lettering to actually stay put. The paint inside POSCA markers, often called paint Textas around Australian staffrooms, is a water-based acrylic. It dries quickly to the touch, but getting it to survive daily handling long-term takes specific chemical or heat-setting techniques.
1. Why Adhesion Varies by Surface
POSCA markers use a highly pigmented, titanium dioxide-suspended acrylic emulsion. Because it's completely water-based, the paint behaves very differently depending on the texture of the object you're decorating. Whether a surface absorbs or resists liquid is the starting point for understanding why some artwork lasts and some doesn't.
Porous vs Non-Porous Surfaces: Australian Weather and Handling
Porous materials like raw timber or unglazed clay pots pull the acrylic binder deep into their fibres through capillary action. That internal absorption creates a natural bond, so the dried artwork resists scratching or rubbing right from the start.
Non-porous surfaces like tempered glass or glossy ceramic glazes offer no absorption at all. On these items the paint dries as a thin film sitting on top of the surface. Without baking or a clear coat afterwards, the whole design can be scraped off with a fingernail or lifted by moisture.
Australian humidity adds another risk. The high relative humidity of a sub-tropical Queensland summer or a coastal Sydney beach season delays how long water-based paint takes to fully evaporate. If you apply a heavy clear sealant before the acrylic underneath has fully cured, moisture gets trapped. That causes tiny blisters along fine linework, and the whole design can separate from the surface within weeks.
Don't mix up your ceramic categories. Rough, unglazed clay (terracotta pots, bisqueware) takes the higher 220°C cure. Glazed porcelain and commercial tableware use the same, lower 160°C setting as glass, capped at 45 minutes. Baking a glazed mug at 220°C runs hotter and longer than the paint manufacturer's own instructions call for.
| Surface Type | Example (AU) | Porosity | Clean With | Bake or Seal With | Result |
|---|---|---|---|---|---|
| Untreated Timber | Raw Tasmanian Oak, Radiata Pine pallets, craft MDF | Highly Porous | Dry tack-rag dusting, optional clear shellac sealing | Water-based Matte or Satin Polyurethane spray (2–3 coats) | Scuff-proof, UV-protected indoor/outdoor signage |
| Annealed & Tempered Glass | Upcycled glass jars, retail display windows, wine glasses | Non-Porous (zero absorption) | 99% pure isopropyl alcohol rub | Cold oven, bake at 160°C for 45 mins, then archival clear varnish | Hand-wash safe, condensation-resistant decorative glass |
| Unglazed Terracotta & Clay | Bunnings standard outdoor pots, bisque-fired earthenware | Semi-porous to porous | Damp microfibre wipe down, then let fully dry | Cold oven, bake at 220°C for 45 mins, then UV-resistant outdoor clear coat | Weatherproof, UV-stable garden decor |
| Pre-Glazed Ceramic / Porcelain | Target/Kmart tableware, commercial white coffee mugs | Non-porous (vitrified silicate) | Isopropyl alcohol wipe to remove finger oils | Cold oven, bake at 160°C for no more than 45 mins, then acrylic-safe clear gloss coat | Scratch-resistant display items (strictly non-food contact) |
2. How to Seal POSCA on Glass
Getting paint to stick to glass takes careful cleaning followed by controlled baking. Skip a step in this process and the paint will lift the first time it gets wet.
Step 1: Clean the Surface Properly
Standard dish soap often leaves behind invisible residue that changes the surface tension of glass, which stops water-based acrylic from gripping properly. Saturate a fresh microfibre cloth with pure isopropyl alcohol and scrub the whole item. This strips away manufacturing residue, silicone traces, and finger oils.
Step 2: Let It Dry Before Baking
Once your design is applied, leave the item completely undisturbed in a low-humidity room for a full 24 hours. Don't skip this step. If you put the glass in an oven while the paint still has moisture in it, that water flashes to steam under heat, and the linework bubbles and cracks.
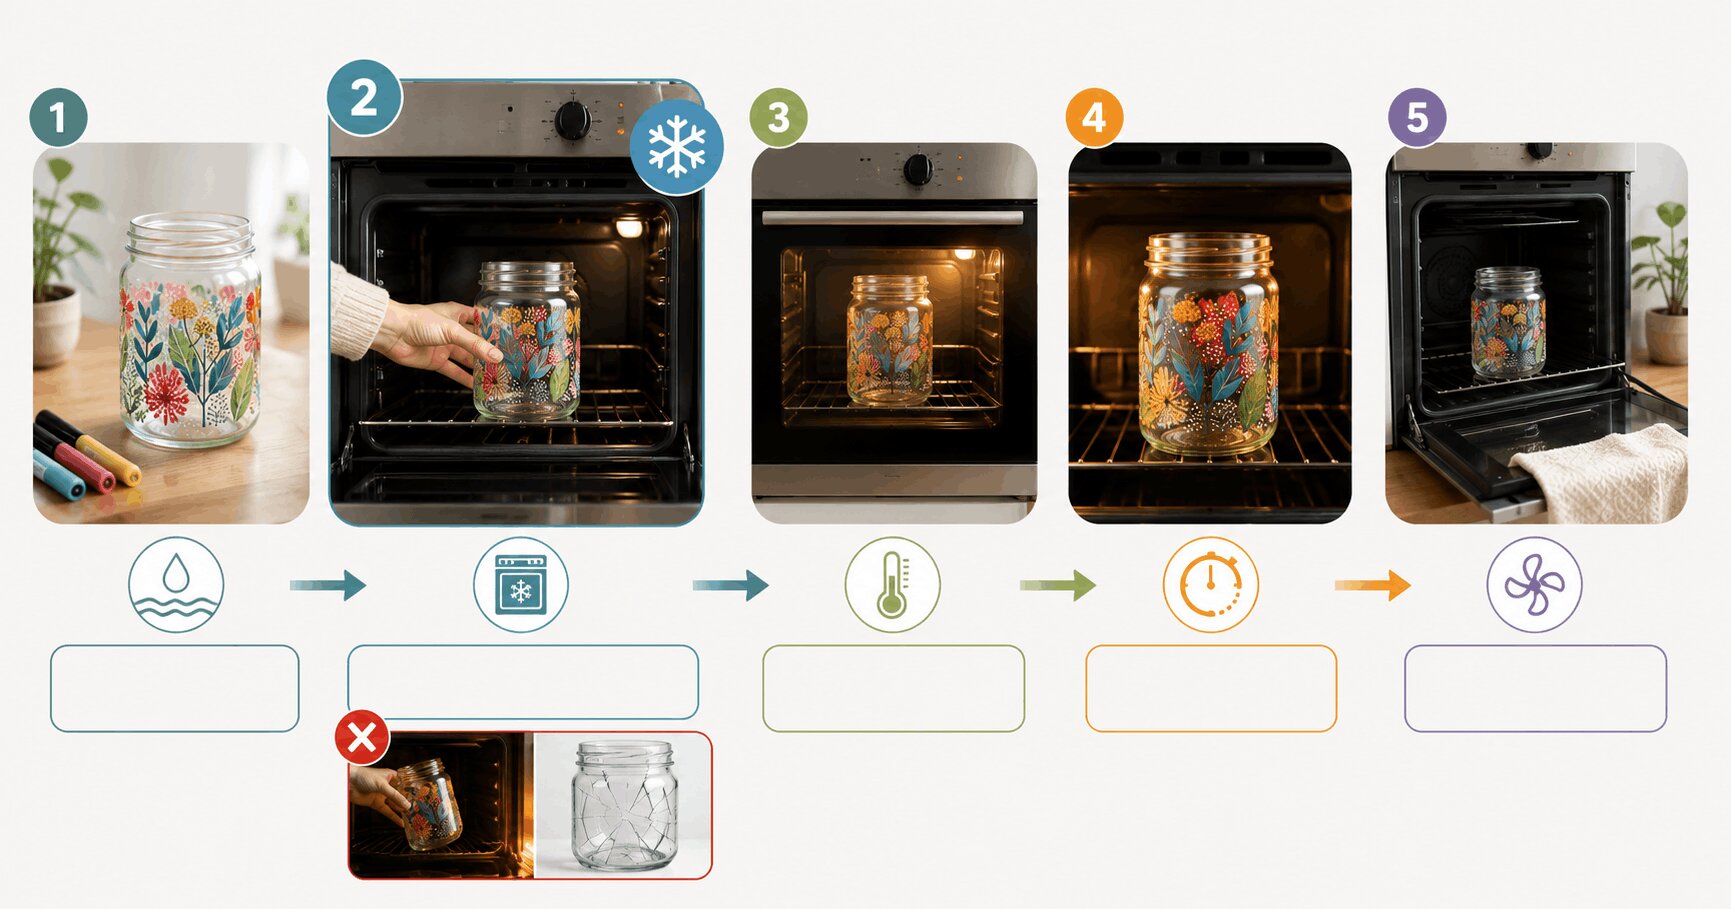
Step 3: Bake in a Cold Oven
To avoid thermal shock cracking your glassware, always start from a cold oven rather than a preheated one.
- Place your fully dry, painted glassware into a completely cold, unheated domestic oven.
- Set the thermostat to 160°C and wait until the oven fully reaches that temperature before starting your timer.
- Bake at 160°C for 45 minutes to cure the acrylic.
- Turn off the oven, leave the door closed, and let the glass cool back to room temperature slowly inside.
Step 4: Apply the Protective Topcoat
Work outdoors or in a well-ventilated area. Hold your water-based clear acrylic aerosol varnish 30cm away from the glass. Apply 2 to 3 thin, even misting layers, waiting 15 minutes between each coat to build up a scratch-resistant barrier.
3. How to Seal POSCA on Wood
Raw Australian native timbers behave differently to manufactured composite materials. Hardwoods contain organic compounds that can damage your work over time if you don't treat the surface first.
Sanding and Cleaning the Surface
Highly porous grain can make fine-tip lines look patchy or feather out. Start by flattening the timber with a progression of 180-grit to 240-grit sandpaper. This levels the fibres without polishing the wood too smooth, leaving just enough texture for the paint to grip. Wipe away all sawdust with a dry tack rag or microfibre cloth before painting.
Blocking Tannin Bleed on Native Hardwoods
Dense local hardwoods like Jarrah, Spotted Gum, Tasmanian Oak, or Merbau contain natural, water-soluble compounds called tannins. When a water-based paint marker goes directly onto unprimed timber, the liquid draws these amber and reddish pigments out of the wood as it dries. Within 48 hours, clean white lines or soft pastel details discolour into a blotched, yellowish-brown tone.
To stop this, seal the raw wood grain first. Apply a thin layer of clear shellac primer or acrylic gesso before you start painting. This blocks the tannins from bleeding up into your artwork.
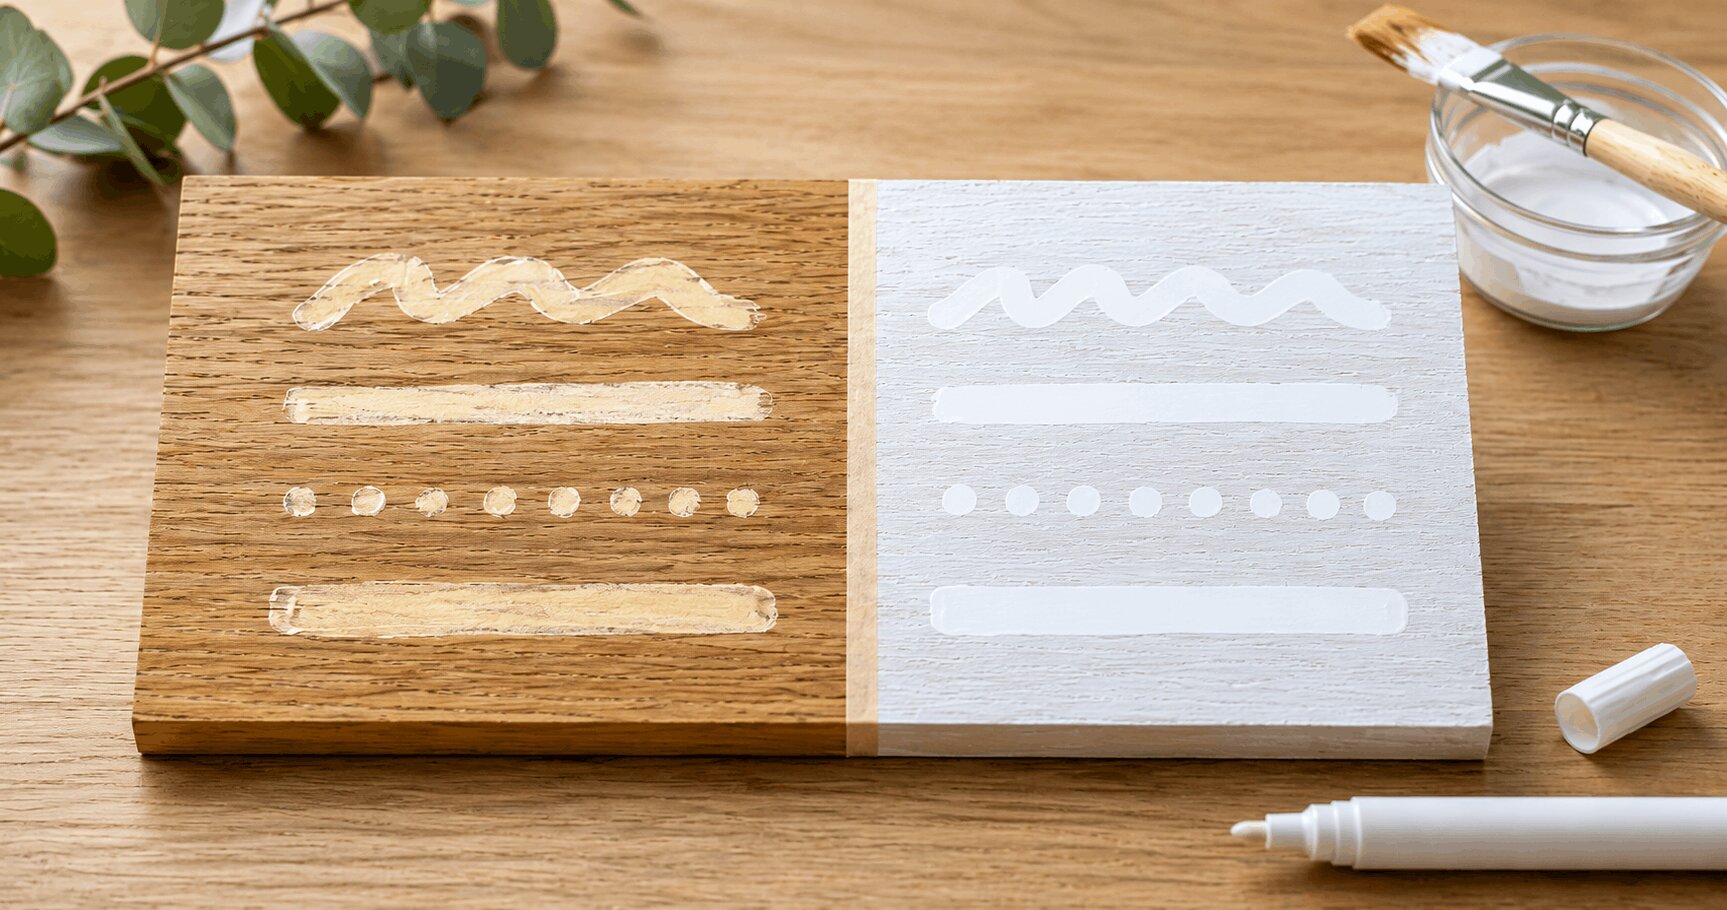
Choosing a Topcoat: Brush-On vs Aerosol
Once your artwork has dried for 24 hours, apply a topcoat. Avoid hard, rigid oil enamels here, since timber expands and contracts with seasonal humidity and will crack a brittle coating. Choose a flexible, water-based clear acrylic or polyurethane varnish instead, applying multiple thin layers for a durable, weather-resistant finish.
4. How to Seal POSCA on Ceramic and Pottery
Craft videos online often suggest that baking a cheap, glossy coffee mug at home will permanently fuse your paint into the glaze. That's not physically possible.
Commercial tableware, like a budget-friendly Kmart or Target porcelain mug, has already been fired in an industrial kiln at over 1,200°C. That process turns the raw silica glaze into a hard, non-porous glass layer. Heating that item in a home oven only hardens the acrylic paint layer slightly. It can't form a chemical bond with the already-hardened glaze underneath.
Without a protective topcoat applied after baking, daily handling or an ordinary kitchen sponge will eventually catch the edge of the paint and scratch it off.
Two Different Bake Temperatures for Ceramics
How the ceramic was fired decides your bake temperature. Mix the two up and you either under-cure the paint or over-bake the item for no benefit:
- Raw, unglazed terracotta pots or bisqueware: clean the surface with a damp microfibre cloth and let the clay body dry completely. Apply your artwork, then let it air-cure for 24 hours. Place it in a cold domestic oven, set the heat to 220°C, and bake for 45 minutes once the oven reaches temperature.
- Pre-glazed porcelain or commercial tableware (a Kmart or Target mug, or glazed terracotta): follow the same cold-oven method, but set the heat to 160°C and bake for no more than 45 minutes, the same setting used for glass. Glazed surfaces don't need, and shouldn't get, the higher 220°C used for raw clay.
Either way, let the piece cool down entirely inside the closed oven before applying a UV-stabilised exterior clear spray coat (for outdoor terracotta) or an acrylic-safe clear gloss coat (for indoor tableware) to protect the finish.
Not food-safe: POSCA paint isn't certified food-safe under Australian consumer laws or Food Standards Australia New Zealand (FSANZ) rules. No aftermarket varnish or home baking cycle changes that. Keep all artwork at least 20mm below the rim of any cup or glass to avoid lip contact, and stick to the outside surfaces of mugs or the undersides of glass serving trays.
5. Troubleshooting Common Sealing Problems
Even with careful prep, small mistakes in product choice or timing can undo a finished piece. Here's how to fix the most common ones.
The Paint Smudged as Soon as I Sprayed Clear Coat
Many heavy-duty clear lacquers sold in trade stores contain solvents like acetone, xylene, or toluene. When these hit water-based acrylic paint, they act like paint stripper, dissolving the dry binder instantly and turning fine details into a muddy smear.
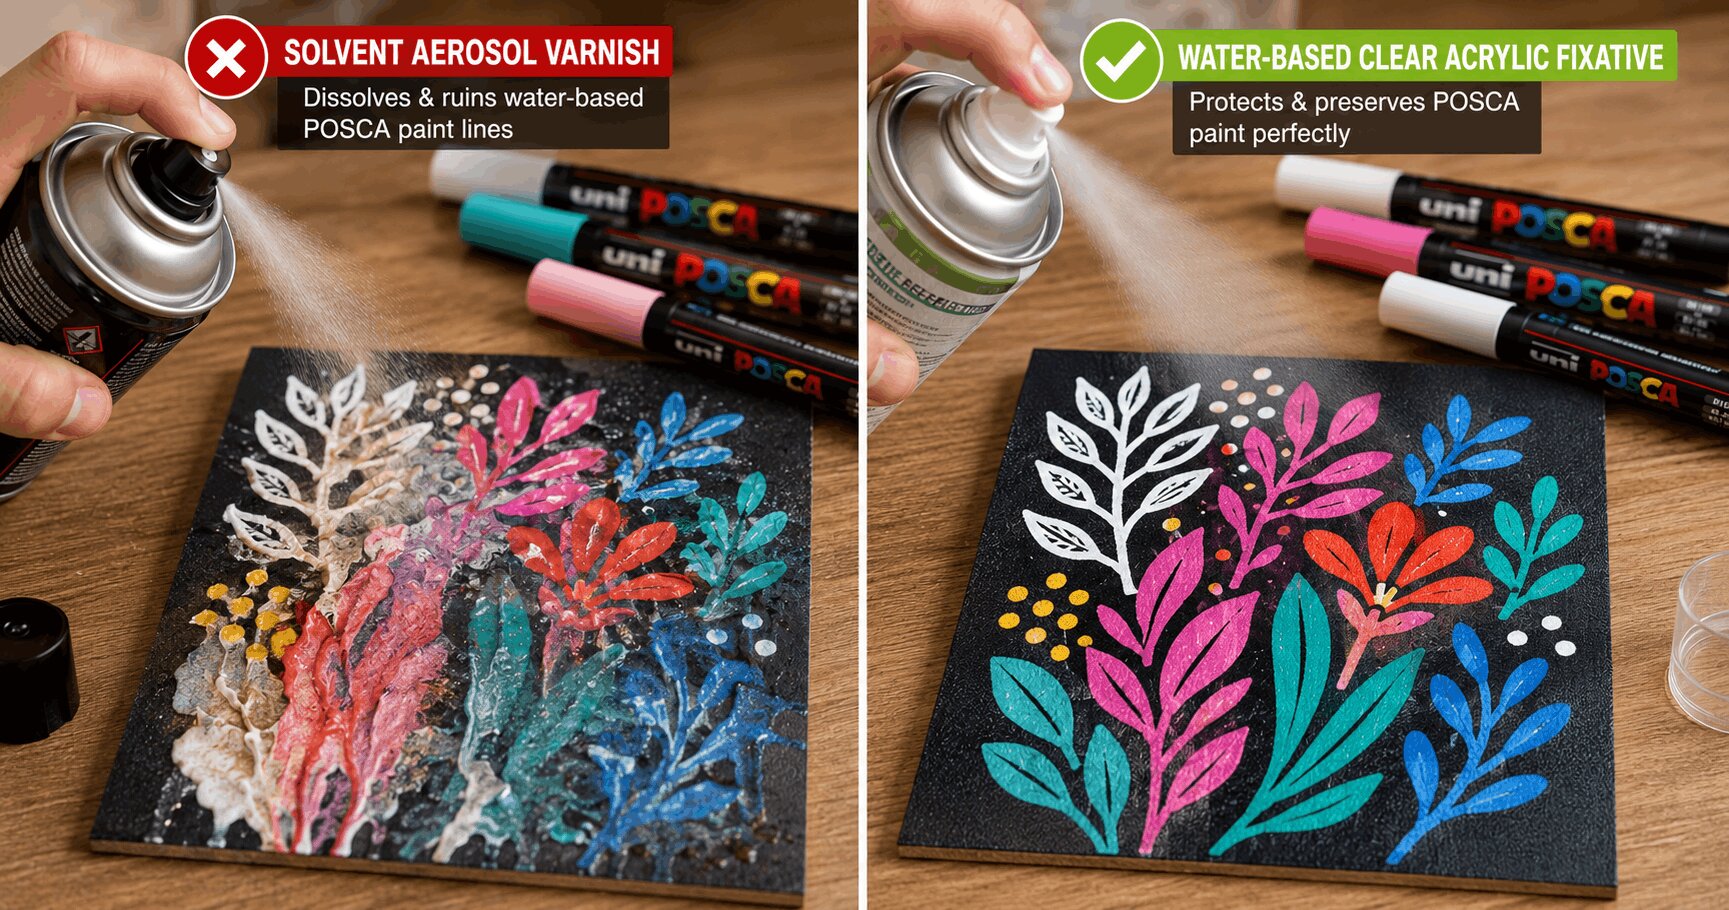
If this happens, let the damaged area dry out fully. Sand back the ruined paint, redraw your design, and swap your topcoat for a dedicated water-based or archival-safe clear acrylic aerosol fixative. Shake the can well and apply the first two coats as a light misting spray from 30cm away to lock the pigment down without pooling.
The Paint Is Bubbling and Peeling After Baking
This happens when trapped moisture inside the paint expands under heat. If an item goes into a hot oven before the paint has fully dried, residual water flashes to steam and breaks the bond with the surface underneath. Clean the damaged paint away with isopropyl alcohol, reapply your artwork, and leave it to dry for 24 to 48 hours before starting the cold-oven bake again.
The Finish Looks Frosty, Cloudy, or Milky
A cloudy clear coat usually means moisture from high humidity got trapped in the spray during application. Spraying clear gloss on a rainy or humid afternoon lets the varnish droplets pick up water vapour on their way to your project, and that haze gets sealed into the finish.
To fix it, wait for a dry, low-humidity afternoon and apply an ultra-thin coat of clear gloss spray over the affected area. The fresh solvent in the light spray often re-wets the cloudy layer, letting the trapped moisture escape cleanly as it cures.
The Sealed Design Scratched Off in the Dishwasher
No home sealer or baking routine will make water-based acrylic paint fully dishwasher-safe. Strong detergents, sustained heat, and high-pressure jets will break down the bond over time. Clean off any loose flecks, redraw the missing parts of the design, re-bake and reseal following the correct method, and switch the item to hand-washing only with a soft, non-abrasive sponge.
6. Where to Buy Sealants in Australia
You don't need imported craft products from overseas video guides. These sealants work well with water-based acrylic paint and are easy to find at major Australian retailers.
| Target Surface | Recommended Local Sealant Brand | Product Type | Available Retailers (AU) | Ideal Finish Result |
|---|---|---|---|---|
| Glass & Ceramics | Micador Crystal Clear Varnish | Water-Based Acrylic Aerosol | Officeworks, Spotlight, Independent Art Shops | High-clarity, non-yellowing protective seal |
| All Surfaces | Dulux Duramax Clear Gloss or Matte | Premium Acrylic Clear Spray | Bunnings Warehouse, Mitre 10 | Quick-drying, high-durability defensive shield |
| Raw Timber & MDF | Feast Watson Clear Varnish | Water-Based Clear Polyurethane | Bunnings Warehouse | Elastic, hard-wearing protective barrier |
Decorating a fabric surface as part of the same project? See our companion guide on how to heat-set POSCA pens on fabric for the equivalent curing process on soft, porous textiles.
Frequently Asked Questions
Can baked and sealed POSCA pen items go in the dishwasher?
No, baked and sealed POSCA designs are not dishwasher-safe. The harsh alkaline formulations of dishwasher tablets, combined with sustained high water temperatures and high-pressure jets, will degrade and lift the acrylic paint layer over time. Items must be gently washed by hand using warm water and a non-abrasive dishcloth.
Are POSCA markers food-safe once they are heat-sealed with a varnish?
No, POSCA markers are not certified food-safe under Australian consumer regulations, and no aftermarket clear topcoat varnish makes them safe for direct food contact. Keep all artwork confined to decorative surfaces, such as the outer walls of coffee mugs or the undersides of decorative glass platters, keeping the paint well away from lip-contact zones.
Why did my POSCA artwork bleed and smudge as soon as I sprayed clear coat over it?
This occurs because the clear coat you applied contained harsh solvents like acetone, toluene, or xylene. These compounds dissolve the water-based acrylic binder of the POSCA pen on contact. To prevent this, always choose an archival, water-based acrylic aerosol fixative, and apply the initial layers as a light mist from 30cm away.
Do I bake a glazed mug and an unglazed terracotta pot at the same temperature?
No. Unglazed terracotta and bisqueware are baked at 220°C for 45 minutes. Pre-glazed porcelain and commercial tableware (like a Kmart or Target mug) use the lower 160°C setting, for no more than 45 minutes, the same temperature and time limit used for glass.


Any comments?