
How to Use POSCA Pens on Fabric: A Step-by-Step Guide to Heat-Setting

To use POSCA pens on fabric permanently, allow the paint to air-dry completely, then heat-set the design using a dry domestic iron (ironed from the reverse side, no steam), a clothes dryer, or a commercial heat press. This thermal curing process cross-links the acrylic polymers, bonding the pigment directly to the textile fibres so it survives regular machine washes without flaking, fading, or smearing.
Method verified against POSCA's official fabric & textiles support page.
Is POSCA Paint Permanent on Fabric? The Short Answer
Genuine Uni POSCA markers use a water-based pigment paint that dries to a solid, matte, and highly opaque finish. Unlike standard dye-based fabric markers or traditional "fabric textas" that chemically stain yarn fibres, POSCA paint sits as a flexible liquid acrylic layer that physically grips onto porous surfaces.
Acrylic Polymer vs Dye-Based Fabric Markers
Traditional fabric textas rely on fluid ink dyes that sink deeply into threads, which often gives a translucent finish that struggles to show up on darker garments. POSCA paint pens use a dense suspension of acrylic resins that sit directly over the textile structure. That's what lets you draw bright whites, pastels, and metallics over pitch-black denim or dark school uniforms with strong coverage.
Why Curing and Drying Aren't the Same Thing
Understanding the difference between drying and curing is what separates a design that peels off from one that lasts. Within roughly 30 to 60 minutes of application, the water content in POSCA paint evaporates, so the design feels dry to the touch. But the acrylic resin underneath is still uncured, and it stays vulnerable to friction and detergent breakdown during laundry cycles until it's heat-set.
Permanence requires heat. Applying heat cross-links the acrylic molecules, fusing the paint into the microscopic gaps of the fabric weave so it can't easily detach. POSCA's own guidance confirms the fabric isn't wash-durable until this step is done: "if you follow our fixing advice, you can make your creations permanent."[1]
What Works, What Fails, and What Melts: Choosing a Fabric
Different textiles react differently to a valve-action acrylic paint pen. The fabric you pick affects how smoothly the pen glides, how much paint it uses, and which heat-setting method you should choose.
100% Natural Fibres: Cotton, Linen, and Denim
Woven cotton, heavy denim, and linen are the easiest fabrics to work with. Their porous surface soaks up the acrylic binder and forms a strong mechanical bond. These materials also tolerate higher iron temperatures than synthetics, though POSCA itself still advises checking your iron's fabric-specific dial rather than using one fixed number, since domestic irons vary.
Synthetic & Blended Fabrics: Polyester, Poly-Cotton, and Nylon
Synthetic fibres like nylon and polyester are slick, non-porous extruded plastics. The paint can't easily soak into them, so it sits on the surface and can feel stiff or scratchy. Even low-cost school polo shirts from Kmart or Big W are often poly-cotton blends (commonly around 65% polyester and 35% cotton). These synthetic fibres can scorch or glaze under high heat, which is why a hairdryer is the safer default for anything majority-synthetic, rather than a direct iron.[1][2]
Textured Textiles: Canvas, Corduroy, and Open-Weave Knits
Heavy cotton canvas, the kind used in library tote bags and classic sneakers like Converse or Vans, holds up well under detailed marker work. The tight weave limits paint bleed and gives a durable surface to draw on. Ribbed materials like corduroy or open-weave knits are harder work: their deep valleys need a broader nib and careful layering to keep the colour even across the whole surface.
| Fabric Substrate | Best POSCA Nib Size | Ideal Project Use Case | Heat-Setting Approach | Expected Wash Durability | Expert Survival Tip |
|---|---|---|---|---|---|
| 100% Cotton (T-shirts, Tote bags) | PC-3M (Fine), PC-5M (Medium) | Custom streetwear, event t-shirts, school library bags | Iron on Cotton setting, reverse side, no steam | High (repeated washes) | Stretch the fabric slightly over cardboard before drawing to close yarn gaps. |
| Heavy Canvas (Sneakers, Backpacks) | PC-5M, PC-7M, PC-8K (Chisel) | Custom Vans/Converse shoes, heavy tote bags | Hairdryer, 30cm away, circular motion | High (friction-dependent) | Use a clean toothbrush to scrub out loose lint or canvas dust before sketching. |
| Denim (Jackets, Jeans) | PC-5M (Medium), PC-8K (Broad) | Back-panel jacket artwork, pocket detailing | Iron on Cotton setting, reverse side, no steam | Very High | Dark denim requires a base layer of POSCA White (PC-5M) to make top colours pop. |
| Poly-Cotton Blend (65/35 School Polos) | PC-1M (Extra-Fine), PC-3M (Fine) | School uniforms, iron-on labels, sports day gear | Iron on Synthetic/Wool setting, reverse side, or hairdryer if unsure | Medium-High | Use extremely light strokes; the polyester component accelerates edge bleeding. |
| 100% Polyester / Nylon (Sportswear, Windbreakers) | PC-3M (Fine) | Activewear mods, satin banners, cosplay armour pieces | Hairdryer only, 30cm away (do not iron directly) | Medium (hand-wash preferred) | Lightly scuff slick synthetic surfaces with ultra-fine sandpaper to create a physical grip. |
Preparing Your Textiles Before You Start
Skipping preparation is the most common reason a design fails early. Follow these steps before you apply a single stroke of paint.
Pre-Wash New Fabric to Remove Factory Sizing
Brand-new apparel arrives coated in industrial starches, sizing agents, and anti-wrinkle solutions to keep it looking pristine on retail hangers. If you draw straight onto unwashed clothing, the POSCA paint bonds to these chemical coatings instead of the yarn underneath. In the first wash, the sizing breaks down and washes away, taking your artwork with it. POSCA's own care guidance opens with exactly this instruction: "machine-wash the fabric to remove any industrial coatings if it is new."[1]
Skip the fabric softener. Run new garments through a full wash cycle without any fabric softener. Softeners coat fabric in a thin silicone film that stops acrylic paint adhering properly.
Use a Bleed Board to Keep the Fabric Stable
Knitted garments like jersey cotton stretch and move as you press down with a marker, which makes clean lines difficult. Slide a piece of rigid corrugated cardboard wrapped in clean baking parchment paper inside the t-shirt or tote bag. This gives you a flat, stable drawing surface, keeps the fabric taut, and stops wet paint seeping through to the back panel.
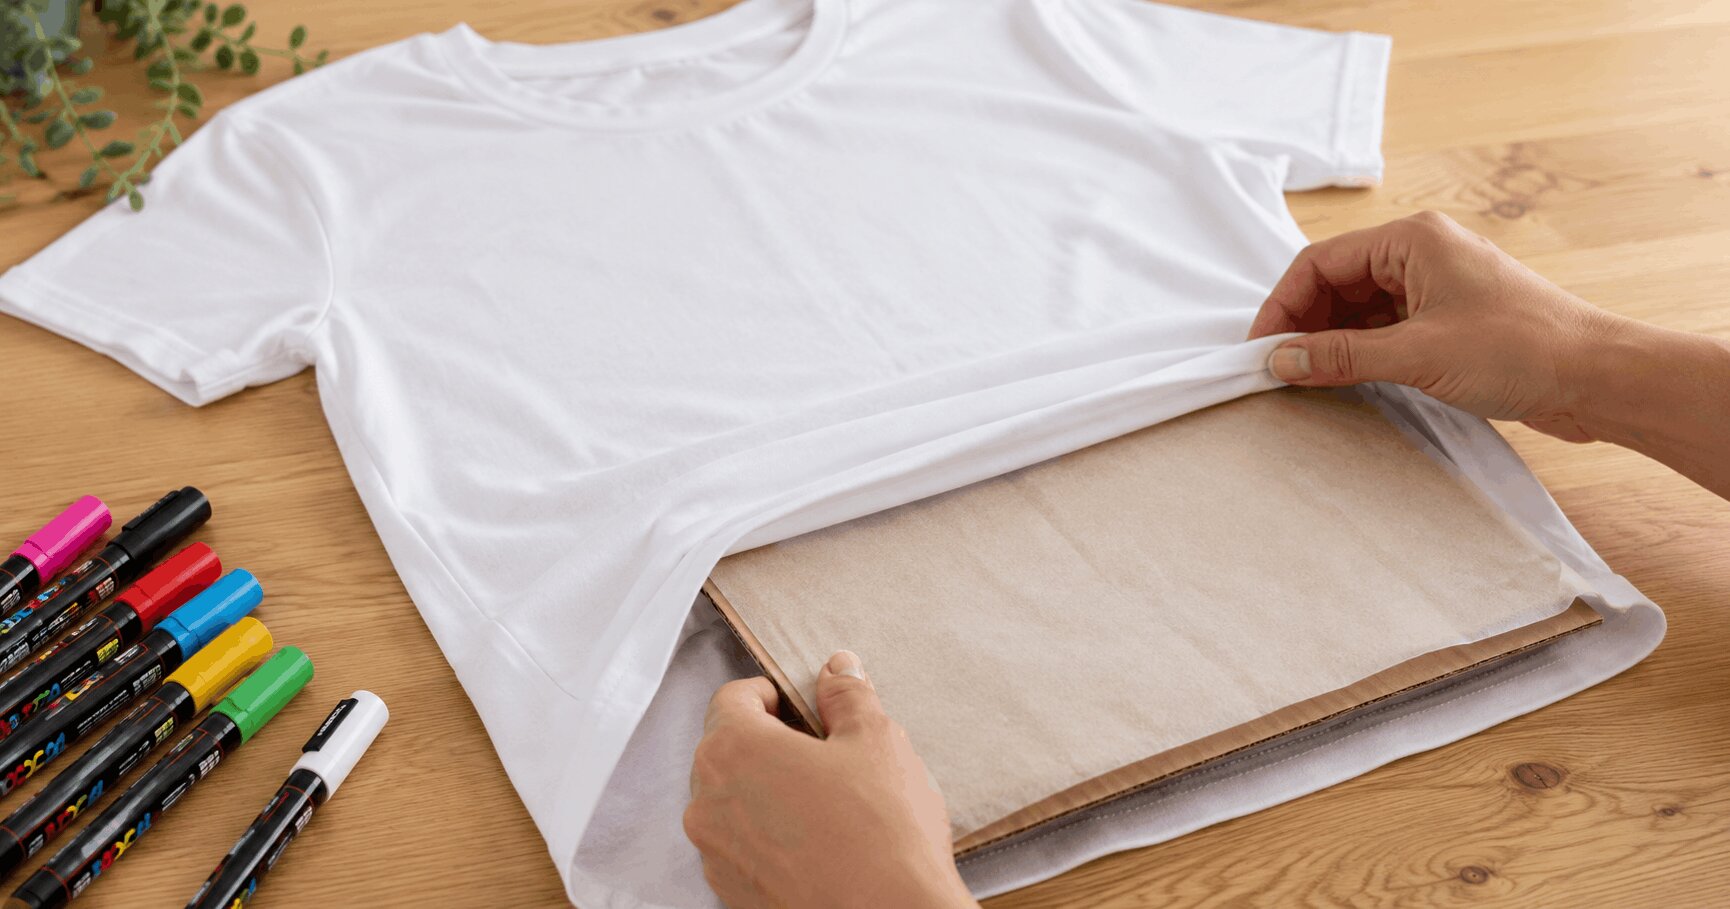
How to Apply POSCA Pens to Fabric Without Bleeding
Controlling paint flow on an absorbent textile takes a different technique to working on paper or metal.
Priming Your Nib for Fabric
Don't press a fresh, valve-action marker tip straight down onto soft fabric. The fabric will give under pressure, unseating the pen's internal valve and dumping a puddle of wet paint onto your project.
Shake the pen well with the cap securely on, then press the nib vertically onto a piece of heavy scrap cardboard until the ink visibly saturates the felt tip. Blot off any pooled liquid on the card before you start on the fabric itself.
Stroking Technique to Prevent Bleeding on Loose Weaves
Woven threads act like tiny straws. If a saturated felt tip rests too long on a garment, capillary action pulls excess paint outward and blurs clean outlines into fuzzy, feathered edges.
Use a swift, light, single-direction sweeping stroke across the grain of the fabric instead. Avoid a sawing back-and-forth motion, which pulls up cotton lint and creates puddles. Keep your hand moving at a steady pace for a more even line.
Layering Light Colours Over Dark Fabric
One of POSCA's strengths is opacity, but stacking colours takes patience. Laying bright yellow over a freshly drawn black background while it's still wet will blend the two into a grey smear. Let base layers air-dry completely for at least 20 to 30 minutes before adding lighter accent tones over dark areas.
How to Heat-Set POSCA Pens on Fabric Permanently
Once your design is finished, choose one of these heat-setting methods to lock the artwork in against wear and washing. The iron and hairdryer steps below follow POSCA's official fixing instructions directly.[1]
Method 1: The Domestic Iron Method (Best for Clothing & Totes)
Use the Domestic Iron Method. Gives direct, targeted pressure and precise heat control on standard cotton, denim, and linen weaves.
Use the Hairdryer Method. Safely reaches recessed contours and avoids melting rubber outsoles, metal eyelets, or structural plastic buckles.
- Let it air-dry completely. Wait until the paint is fully dry before ironing. Most guidance recommends at least 24 hours to be safe.[3] Ironing damp, uncured acrylic will re-liquefy the paint and smudge your line work.
- Turn off the steam. Empty your iron's water reservoir completely or switch to a fully dry setting. POSCA's own instructions are explicit on this point: iron "without using steam."[1] Moisture breaks down the water-based binder before it can fuse, damaging the design.
- Iron from the reverse side. Turn the garment inside out where you can. POSCA's official guidance specifies ironing "from the reverse side" of the fabric, not directly over the painted face.[1] If that isn't possible for your project, lay a fresh piece of baking paper, greaseproof sheet, or thin cotton tea towel over the painted face instead. Never let a bare iron soleplate touch cured acrylic paint directly.
- Keep the iron moving. Set the heat to match your fabric type using your iron's own fabric-setting dial (Cotton/Linen for natural fibres, Synthetic/Wool for blends) rather than one fixed temperature, since domestic irons vary by brand. Press down and move the iron in continuous, steady paths across the fabric or protective sheet for a few minutes. Don't leave the iron resting on one spot, or you risk scorching the fabric.
- Let it cool. Let the fabric, and any protective sheet, cool completely to room temperature before you handle it. Moving it while still hot can lift fine pigment away from the fibres.
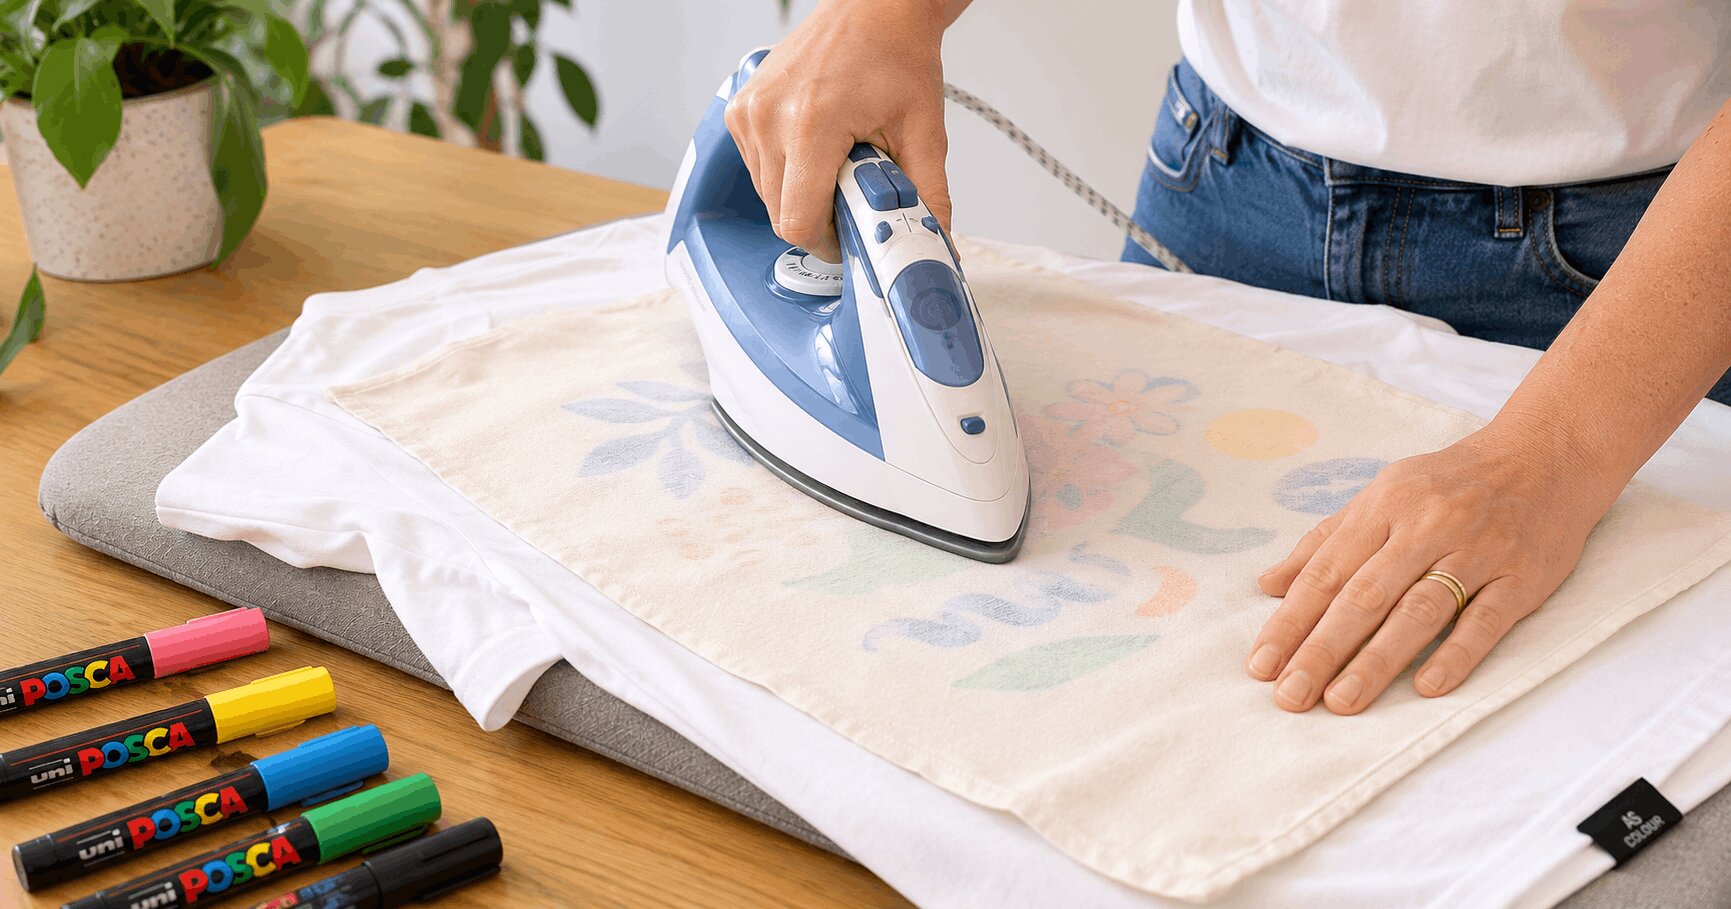
Method 2: The Hairdryer Method (For Heat-Sensitive Fabrics)
For fabrics that can't safely go under an iron, such as synthetics, delicate blends, or anything with trims that could melt, POSCA's official advice is to use a hairdryer. Hold it 30cm away from the surface and move it in small circular movements until the design is heat-fixed.[1] That 30cm figure comes directly from POSCA, so don't hold the dryer closer than that, since concentrated heat at close range risks scorching or uneven curing.
Method 3: The Commercial Heat Press (For Small Businesses)
If you're preparing custom apparel for a market stall or online store, a commercial heat press gives more uniform heat and pressure than an iron, and it's a standard tool in the print-on-demand and custom apparel trade. Follow your heat press manufacturer's temperature and dwell-time chart for the fabric you're using, and always shield the artwork with a protective Teflon sheet or baking paper, following the same no-direct-contact principle POSCA specifies for irons.
Method 4: The Clothes Dryer Alternative (For Bulky Items)
Panelled denim jackets, thick winter hoodies, and heavily zippered canvas backpacks are hard to iron flat. Turn these items inside out and run them through a tumble dryer on high heat instead of spot-ironing awkward shapes. This helps cure the acrylic binder across uneven seams. As with any heat-setting method on a garment you haven't tested before, check a small hidden area first.
Fixing Fabric Painting Mistakes
Mistakes happen. Here are some ways to recover a project rather than starting again.
Fixing Wet Paint Bleeds and Smudges Mid-Design
If your hand slips or the pen drops a blot of wet paint, don't rub it away with a rag. Rubbing spreads the paint sideways and pushes pigment deeper into the yarn, which can leave a permanent stain.
Instead, use a clean cotton bud dampened with cold water and a single drop of liquid laundry detergent. Blot straight down to lift the wet paint out of the fabric. Flush the back of the fabric under cold running water straight away to rinse out the remaining pigment before it sets.
Reviving a Nib Clogged with Fabric Lint
Drawing on raw canvas, corduroy, or textured denim pulls loose lint into the porous felt nib, which can block the pen's ink flow.
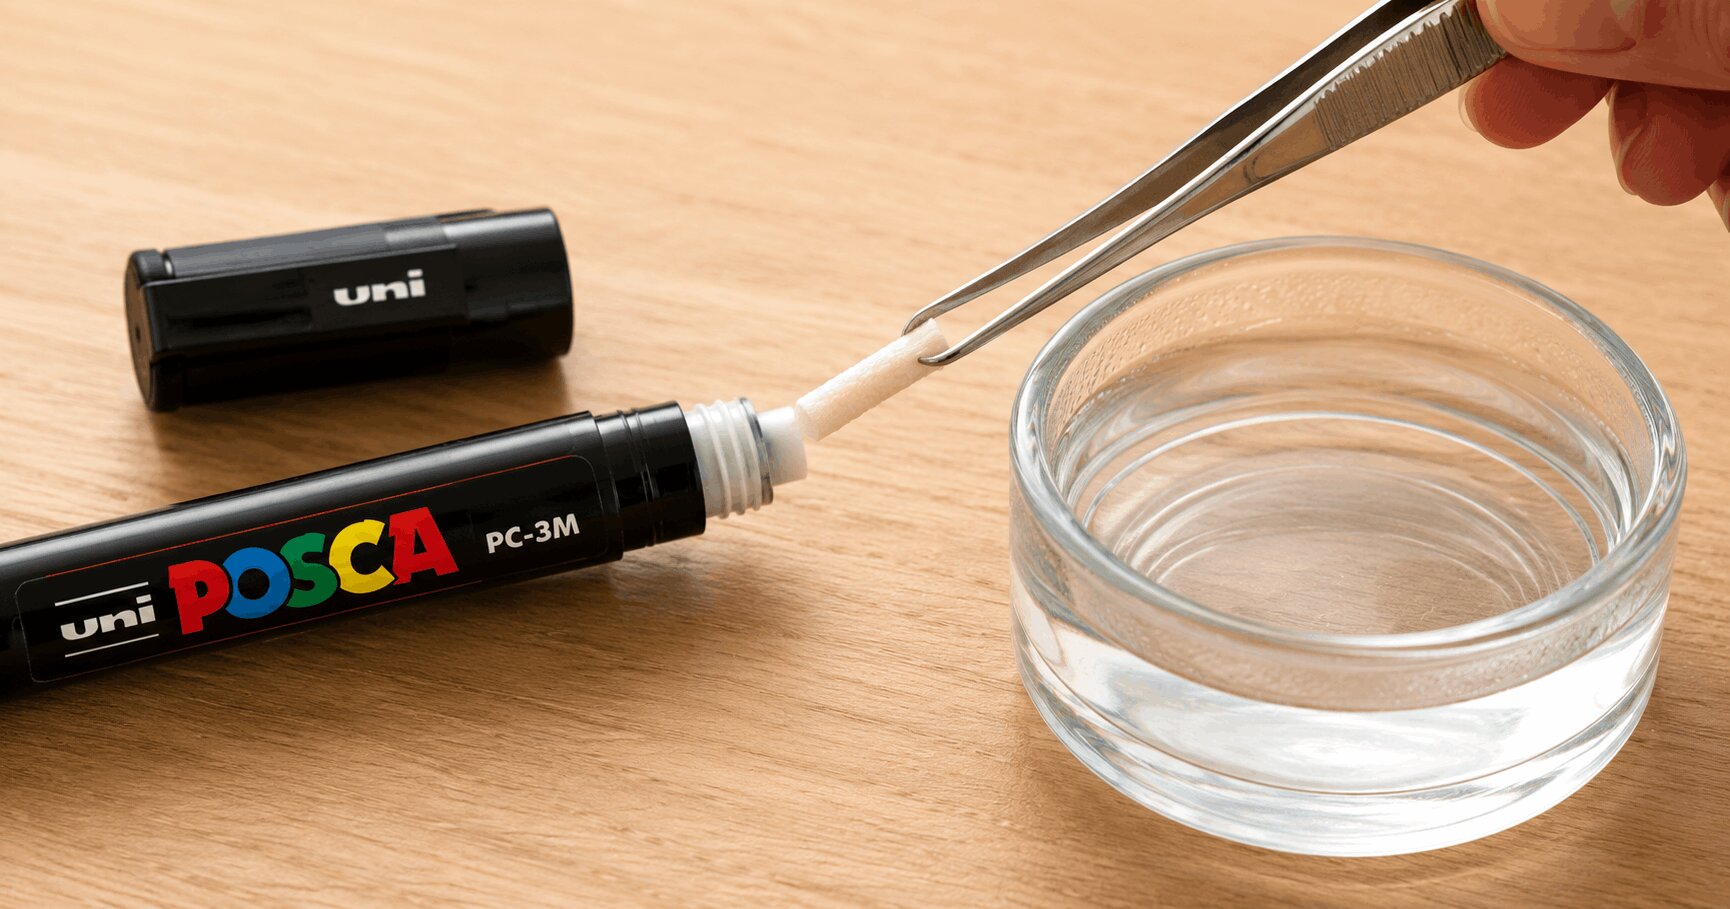
Don't throw the marker away. Use a pair of precision tweezers to gently pull the felt nib out of the plastic barrel. Soak the nib in a small cup of clean, warm water overnight to dissolve dried acrylic and release trapped lint. Rinse it, dry it with a paper towel, put it back in the barrel, and re-prime on scrap card.
What to Do If Your Paint Cracks After the First Wash
Cracking happens when POSCA paint is applied as a thick, rigid layer over a stretchy knit garment. When the fabric stretches in the wash, the rigid acrylic coating splits. Third-party guides note this same failure mode on stretchy fabrics.[3]
To repair it, lightly sand the cracked paint ridges to remove loose flecks, brush away the debris, and apply a thinned coat of POSCA paint into the cracks using a fine PC-1M tip. Let it dry, then heat-set again while stretching the fabric slightly to build a more flexible repair layer.
Care & Washing Instructions for the Australian Climate
After heat-setting your project, let the design rest for a day or so before the first machine wash. This gives the newly cross-linked polymer chains time to settle fully.
When washing, turn the item inside out to protect the outer face from friction against buttons, zippers, or the washing machine drum. Use a cold-water setting with a mild liquid laundry detergent on a gentle spin cycle.
POSCA pigments have good lightfastness, but the intense UV levels of an open Australian backyard clothesline can still speed up fabric ageing. Hang your customised garments inside out in a well-ventilated, shaded spot rather than exposing them to direct sunlight on a Hills Hoist. This simple habit keeps the colours looking vivid for longer.
Decorating a non-fabric surface as part of the same project? See our companion guide on how to seal POSCA pens on glass, wood, and ceramic surfaces for the equivalent curing process on hard surfaces.
Frequently Asked Questions
Will POSCA pens wash out of fabric if they are not heat-set?
Yes. POSCA markers contain water-based acrylic paint. While they dry matte and opaque on fabric, the uncured polymer bond will break down when exposed to laundry detergents and mechanical friction, causing the design to flake, smear, or wash away in the first wash cycle if it hasn't been heat-set.
Can you use a hairdryer to heat-set POSCA pens on synthetic fabrics?
Yes. For heat-sensitive synthetic textiles like polyester, nylon, or synthetic leather that would melt under a traditional clothing iron, POSCA's own guidance recommends a hairdryer held 30cm away from the surface, moved in small circular motions until fixed.[1]
Do you need to pre-wash new clothing before drawing on it with POSCA pens?
Yes. Brand-new retail garments are treated with chemical sizing agents and starches to keep them wrinkle-free on hangers. Painting over these coatings means the ink sticks to the chemical layer rather than the textile thread, and the artwork peels away during later washes. This is POSCA's own first recommendation for working on textiles.[1]
References
- POSCA. "Fabric, textiles and skins." Official POSCA support page. posca.com/en/support/fabric-textiles-and-skins
- Sewing Machine Talk. "Do Posca Pens Work On Fabric? (Easy & Helpful Guide)."sewingmachinetalk.com/do-posca-pens-work-on-fabric
- CyPaint. "Posca Paint Pens On Fabric: Tips, Tricks, And Creative Possibilities."cypaint.com/article/do-posca-paint-pens-work-on-fabric


Any comments?